Cherries Background

Wednesday, March 23, 2011

100 Cupcakes!

It is Charli's birthday this week and we are having two different family parties for her, which means lots of cupcakes.  Then Z had a scouting event and I said I would make cupcakes for it, which brought my grand total of cupcakes baked in 1 week to 100!  Here are some of the cupcakes.  I don't use any fancy recipe, just a box mix and then my favorite buttercream icing recipe (see below), and for the chocolate frosting, I used a store bought can.  I got this really great cupcake frosting kit from the Prepared Pantry here in Rigby for only $3 and I LOVE IT!

 Ladybug cupcakes made from M&Ms and Airheads

 And a few with mini oreos for adults who don't care for Airheads on their cupcake

 Cookies and Cream cupcakes for the scout leaders

 Chocolate with sprinkles

 And grasshopper cupcakes with the scout emblem made from chocolate!

 Here's how I made the scout logo. First, I printed the scout logo (copying and pasting it in Microsoft Word until I filled the page).  I taped it to my counter with a piece of wax paper taped over top.  Next, I melted 2 cups of chocolate chips in the microwave and put them in a durable zip lock bag.  I barely snipped the corner of the bag and used the bag to pipe over the designs on the paper.  Next, I put the wax paper in the fridge for several hours until the chocolate had set.  I removed the emblems with a spatula and placed them on top of the cupcakes!  I love how they turned out.
The whole time I kept thinking, there is no way that this is going to work and it kept working.  I couldn't believe how awesome they turned out!

BUTTERCREAM ICING
Ingredients:
1/2 cup shortening
1/2 cup butter or margarine
1 tsp vanilla
2 tbsp milk
4 cups powdered sugar (about 1 lb)

Directions:
Cream butter and shortening with electric mixer.  Add vanilla.  Gradually add sugar one cup at a time beating well on medium speed.

*For mint frosting add 1/4 tsp of peppermint extract and 10 drops of green food coloring.  These are so good with devil's food cake mix!  I haven't tried it, but I am sure you could also flavor the frosting any way you like with any other extract, maybe I'll try strawberry next.

My Favorite Chowders

We thought it was Spring, but then yesterday we got hit by a blizzard and we needed some good warm comfort food to cheer us up.  The Ham Chowder was a new recipe and a definite winner (I noted as Sweetheart licked her bowl clean and asked for seconds).  The Cheesy Chicken Chowder is a longtime favorite that we all love.


Ham Chowder
From: Food, Folks, and Fun

Ingredients:
1 ½   lb. potatoes, peeled, cooked, and drained
½ C. onion, chopped
½ C. celery, chopped
2 T. butter
1 – 14.5oz. can chicken broth
2 C. milk
1 C. ham, cooked and diced
¼ C. parsley, minced
½ t. salt
1/8 t. freshly cracked pepper
¼ - ½ C. cheddar cheese, shredded (optional)

Directions:
1. Cube and cook potatoes (again, I use Southern-style, or cubed hash browns) and set aside. Saute the onions and celery in butter until tender.

2.  In a blender combine half the potatoes and the onion and celery mixture with a ¼ cup of the chicken broth. Blend until smooth. Add remaining chicken broth and blend.

3.  Pour mixture into a pot and add the milk, remaining potatoes, ham, parsley, salt, and pepper. Bring to a boil, reduce the heat and simmer for 10 minutes, stirring occasionally. Top with cheese if desired.


Cheesy Chicken Chowder

Ingredients:
3 cups chicken broth
2 cups diced potatoes
1 cup diced carrots
1 cup diced celery
1/2 cup diced onion
1 1/2 tsp salt
1/4 tsp pepper
1/4 cup butter
1/3 cup flour
2 cups milk
2 cups shredded cheddar cheese
2 cups diced cooked chicken

Directions:
1.  In a 4-qt. saucepan, bring chicken broth to a boil, reduce heat; add the potatoes, carrots, celery, onion, slat, and pepper.  Cover and simmer for 15 minutes or until vegetables are tender.

2.  Meanwhile, melt butter in a medium saucepan; add flour and mix well.  Gradually, stir in milk; cook over low heat until slightly thickened.  Stir in cheese and cook until melted; add to broth along with chicken.  Cook and stir over low heat until heated through.

Yields 6-8 servings

Mini Bacon Chicken Pot Pies


 The recipe called for these to be baked in individual custard cups to make "mini" pot pies for each family member, which would have been so fun... if I had custard cups.  So, I improvised and baked the whole thing in a 9x13 pan casserole style and it was still very good!

Mini Bacon Chicken Pot Pies
From: Pillsbury

Ingredients:
1 can (10.2 oz) Pillsbury® Grands!® Flaky Layers original refrigerated biscuits
1 jar (12 oz) homestyle chicken gravy
1 tablespoon cornstarch
¾ cup milk
½ teaspoon dried thyme leaves
¼ teaspoon pepper
2 cups cubed cooked chicken
1 bag (12 oz)  frozen mixed vegetables
1 cup diced potatoes (I buy the frozen "southern style" hashbrowns--you know, the little cubes-- and use them in recipes that call for diced potatoes, because they are pre-cooked and cut and SO fast!)
½ cup shredded Cheddar cheese
5 slices bacon, crisply cooked, crumbled (again, I am all about convenience and buy pre-cooked bacon)

Directions:

1. Heat oven to 350°F. Spray 5 (10-oz) ramekins or custard cups with cooking spray. Place on large cookie sheet with sides.
2. Separate dough into 5 biscuits; cut each biscuit into quarters. Set aside. In 3-quart saucepan, stir gravy and cornstarch with wire whisk. Stir in milk, thyme, pepper, chicken, vegetables and potatoes. Heat to boiling over medium-high heat, stirring occasionally. Immediately spoon about 1 cup hot chicken mixture into each ramekin; top each with 4 biscuit pieces.
3. Bake 18 to 20 minutes or until biscuits are golden brown. Carefully remove from oven. Sprinkle cheese evenly over tops of biscuits. Bake about 4 minutes longer or until cheese is melted. Sprinkle with bacon.  *So, I actually had to stick mine back in to bake longer because the biscuits were doughy after this amount of time.  I don't know how to prevent this, any suggestions?*

Wednesday, March 16, 2011

Cheesy Chicken Empanadas

 These are a really fun finger food for kids.  But tasty enough, that you will love them too!

I have tried lots of different fillings with these and for this recipe I have combined a concoction of my favorite fillings recipes, but be creative when you make your own and put in things that your family enjoys.  I think it would also be fun to end the meal by making some dessert ones with apple pie filling!

Cheesy Chicken Empanadas
2 cups cooked shredded chicken
1 can (4 ounces) chopped green chilies
1 package (8 ounces) cream cheese, cubed
1/4 teaspoon ground cumin
1/4 teaspoon chili powder
1 pkg. refrigerated pie crust (or you can make your own)

If baking, you will also need:
1 egg
1 tbsp. water
opt. chili powder

1.  Combine first five ingredients together in a large bowl.  Preheat oven to temperature directions on pie crust package.

2.  Roll out pie crust and cut as many 4 inch circles as you can get, combining pie crust scraps, re-rolling, and cutting more circles. 

3.  Place about 2 tbsp. of filling in the center of each circle.

4.  Fold circles in half and seal edges with a fork.  Carefully place on a baking sheet.  Mix egg and water.  Brush the tops of each empanada with the egg mixture.  Sprinkle with extra chili powder.  Bake according to pie crust directions.
5.  You can also choose to fry these babies, which is also REALLY good.  I have done both ways and they are equally great.  Enjoy!

Pineapple Glazed Meatballs

 These were seriously so good and incredibly fast and easy to make.  I got the idea from a Kraft Food & Family magazine.  They listed them as an appetizer and had very cute toothpicks in each one and arranged on a pretty tray, which would be really fun too, but we decided to try them out with some rice for dinner.

 You only need three ingredients.  Frozen, fully cooked meatballs (purchased at Wal-Mart... or if you are not lazy like me, you could use your favorite meatball recipe), 1 cup BBQ Sauce if using the whole package of meatballs (our favorite is Bulls-Eye), and 1 cup CRUSHED pineapple with juice (you can see in the picture that I accidentally bought pineapple slices, no biggie, I just crushed them in my blender. 
 Mix all three ingredients together in a skillet and cook on medium high heat for 7-10 minutes until the sauce is thick and bubbly and the meatballs are heated through.  Serve with any side you desire.  We chose rice.

As you can see, Charli gave it two enthusiastic thumbs up.  She is licking her plate.  I think she ate 5-6 meatballs!

Wednesday, March 9, 2011

Stromboli

The name might sound fancy, but it is actually a really simple and delicious meal idea!

Plus it just looks so darn pretty!

Stromboli
Ingredients:

For the dough:
1/4 cup warm water
1 tbsp. yeast
1 tsp. sugar
2 tbsp. olive oil
2 tsp. salt
1 cup water
3 1/2-4 cups flour

Directions:
1. Combine 1/4 cup warm water, yeast, and sugar in a large bowl and stir to dissolve.  Let stand until foamy, about 5 minutes.  Stir in remaining warm water, olive oil, and salt.  Gradually add 1 1/2 - 2 cups flour, mixing until smooth.  Gradually add enough remaining flour until you have a smooth dough that comes away from the bowl.  

2. Turn dough out onto a lightly floured surface and knead, working in more flour as needed.  Shape into a ball, place in a greased bowl and cover with a kitchen towel, let rise until doubled, about 1 hour.

3. Preheat oven to 375 degrees and grease a large baking sheet.

4.  Punch down dough and cut in half.  On a lightly floured surface, roll each dough half into a rectangle about 10" by 8". 

Ingredients for Filling (mix and match as you like):
1/2 cup spaghetti or pizza sauce
1/2 tsp. dried oregano
4 oz. sliced pepperoni
2 cups shredded mozzarella cheese
1/3 cup grated Parmesan cheese

1 egg beaten
sesame seeds or poppy seeds (optional)

 1.  Arrange fillings over dough, finishing with a sprinkling of Parmesan cheese.  Roll the dough, much like you would if you were making a jelly roll (cinnamon rolls).  Pinch the edges of the seam and tuck the ends under.

2.  Cut long diagonal slashes, about 1/2 inch deep, along the top of the loaf every 3 inches.  Brush the top of the loaf with a beaten egg.  Sprinkle with poppy or sesame seeds if desired (this is mainly for looks).

3.  Bake for about 30 minutes or until bread is golden brown.  Cool slightly, then cut and serve.

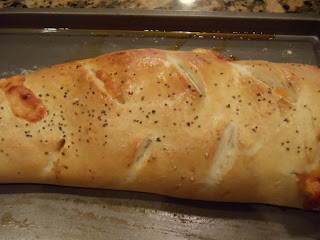
This is what my finished product looked like, I filled it a little full and it leaked out the seams, but it was still delicious.  We NEVER have left overs when I make this dinner!

Chicken Parmesan Melts

These are great for a FAST and EASY meal!

Chicken Parmesan Melt
From: Kraft, Food & Family magazine (Fall 2007)
Ingredients:
1 pkg. grilled chicken breast strips
1/2 cup spaghetti sauce
1 loaf Italian bread, toasted (I used a loaf of French bread, not really sure what the difference is)
1 cup shredded mozzarella cheese
*I changed the quantities on their amounts, because they planned for 2, I am cooking for 5 1/2.

Directions:
1. Preheat oven or toaster oven to 400 degrees.  Toss chicken strips with spaghetti sauce and spoon evenly onto toast slices.

2.  Place on baking sheet; sprinkle with cheese.

3.  Bake 3-4 minutes or until cheese is melted.

Tuesday, March 1, 2011

I Spy: A Mac and Cheese Adventure

I am so tickled with myself.  This may be one of the cleverest things I have ever done with Mac and Cheese.  So, Chew and Chew Dad has been out of town a lot these past couple of weeks with work.  We seem to have this tradition that when Dad is gone, we have Mac and Cheese.  Mac and Cheese is the all time favorite of the Chew and Chew kids, but I have questioned the nutritional value.  So this time around I decided to sneak in some mixed veggies.  I knew I would be met with anger, so I found a way to make it exciting and this is what I came up with...

I SPY: A MACARONI AND CHEESE ADVENTURE!
We love the "I Spy" books at our house, so I knew that this would especially appeal to my kids.

When the kids came to the dinner table (read counter), This is what was waiting for them.  A bowl of mac 'n cheese with a game card and pencil per child.

 Secretly, before I filled the bowls of mac 'n cheese, I taped a piece of gum to the bottom of each bowl.  This is the "Bar of Silver" on the game card.

mmmm... just look at those gorgeous mixed vegetables.  Our mac 'n cheese had carrots, peas, green beans, and corn.

I had looked up "treasures" on the Internet and copied pictures of jewels that closely matched their vegetable counterpart.  When the kids found and ate the jewel/ vegetable, they could cross it off their list.

 This is Sweetheart holding up a Peridot (aka. pea) that she found in her mac 'n cheese.  Notice the big grin!


Okay, and the best part was, they could NOT figure out where the "Bar of Silver" was!  I have never seen T-Man shovel mac 'n cheese into his mouth so fast.  He was determined to be the first to find all of the items.  It wasn't until he finished the whole bowl until he thought to look underneath.  And when the other two found out there was gum, then everyone kicked it into hyper-eating drive to get to the gum.  Gum is a hot commodity at our house!  It gave me a big laugh.  It was quite an adventure.

To make your own: I Spy: A Macaroni and Cheese Adventure:

Prepare your favorite brand of macaroni and cheese according to package directions.
Prepare a cup of mixed vegetables also according to package directions and mix together with the macaroni and cheese.  To use my game card below, your mixed vegetables should include peas, green beans, corn, and carrots.  I also used one stick of gum taped to the bottom of each bowl.

Click on my game card below to enlarge the image.  Next, right click on the image and select "Copy", then open Microsoft Word, or another any program of your choice.  Right-click on the blank document and select "Paste".  This should give you a printable game card.  You can also just right-click on my image and save it, then print it in whatever program works for you.  You will need one game card per person.


Stinks Like Fish

I had this great sounding recipe that I found for this month for Tilapia.... yes fish.  What was I thining?  It doesn't matter that I used three different citrus juices simmered with butter to make a lovely glaze to pour over the beautiful boneless fillets.  It doesn't matter that the Tilapia was baked to white flakey buttery perfection.  The fact remains, Tilapia is fish.

Sweetheart actually started crying about three bites in, because she really wanted dessert, but she just could NOT stomach the fish.  T-Man shoved bites in his mouth and gulped them down with apple juice to get it down, and Buddy just abandoned his plate and ran off to hide.  Then when Z got home from work, he pretended he didn't see his plate at all and filled up instead on the steaming hot bread that I just pulled out of the oven.

Charli liked it though (though I am starting to think she thinks anything is great so long as it's not baby food.)  And I thought it was divine.  But I will not be sharing the recipe with you.  As it got such awful reviews with my family, I don't feel good about endorsing it.  So if you like Tilapia, you are on your own for a recipe, but don't come crying to me when your kids are mad.

Bajio Pork Salad

I am in LOOOVE with Bajio's Pork, so I was super excited when I came across this recipe from the Bajio Operations Director, Bonnie El Halta.  She prepared the recipe for ABC 4 in Salt Lake.  You can view the link HERE.  Or just follow the recipe below.  You can also use the pork in burritos, quesadillas, chimichangas, or whatever else you are feeling saucy for.

Bajio Pork Salad
Ingredients:
3 lbs of pork roast cut into baseball sized pieces
2 quarts of water
4 cups sliced white onions
¼ cup of salt
1 cup of sugar
Boil pork until tender (approximately 2 hours on a medium simmer)
*I actually put the pork like this in my crockpot and let it simmer on low all day, works great!

For the Marinade:Simmer together the following ingredients for 1 hour (Again, used the crockpot, turned to high for 1 hour)
4 cups enchilada sauce
1 cup dark sugar (used brown sugar)
2 cups soda water (couldn't find, so I substituted Sprite)
1 pkg taco seasoning of choice
Cook pork until tender.
Drain pork and shred with a fork, keeping the pork in the original cooking pot.
Pour hot marinade over shredded pork.
Keep warm.

Prepare salad with the following ingredients:
Shredded lettuce
Diced tomatoes
Fresh cilantro
For family style, place salad ingredients in a large bowl.
Top with warm pork.
Add cilantro and lime as garnish.
Add a Ranch Style dressing as desired.

Pork Quesadilla
Using the pork recipe above:
Heat large 14” tortillas.
Sprinkle with cheese.
Add the pork.
Fold over the tortilla and cut into wedges