Pizza Hash Casserole
Ingredients:
Rotini pasta
Spaghetti sauce,
Cooked and seasoned ground beef
Pepperoni,
Olives,
Mozzarella cheese
Directions:
Mix all ingredients together and bake at 350 until warmed through and cheese melted and bubbly.
Showing posts with label Kids. Show all posts
Showing posts with label Kids. Show all posts
Tuesday, June 9, 2015
Friday, October 21, 2011
Monster Sneeze Dip with Dipping Bones

Every year my awesome mom sponsors a grandkids Halloween party. My sisters and I wrack our creative little brains to bring fun snacks and activities to the party. This was my contribution this year. This spinach dip also just so happens to be a family favorite!
Monster Sneeze Dip
(Knorr Spinach Dip)
Source: Knorr
Ingredients:
1 package (10 oz.) frozen chopped spinach, cooked, cooled and squeezed dry 1 container (16 oz.) sour cream 1 cup Hellmann's® or Best Foods® Real Mayonnaise 1 package Knorr® Vegetable recipe mix 1 can (8 oz.) water chestnuts, drained and chopped (optional) 3 green onions, chopped (optional) |
Directions:Combine all ingredients and chill about 2 hours. Serve with your favorite dippers to your favorite people.
Bone Sticks:
Ingredients
1 tube prepared pizza crust
Directions:
Preheat oven according to package directions. Cut long thin strips (about 36) and roll into bone shapes. Place on a greased cookie sheet. Bake according to package directions (though you may want to start watching it a couple of minutes before it it time to take them out, as they are thin and can burn easily), the crunchier the better for dipping!
Happy Halloween!
Wednesday, August 3, 2011
Fireworks Pancakes

I know that I am totally a month late in posting this little gem, but the summers get a little hectic around here, so at least you can use this for next year if you like it!
We love pancakes at our house, and we love food coloring at our house, so this one was a no brainer...

First, you make the pancake batter as you normally would do, and pour it onto the hot griddle. IMMEDIATELY, use various colors of food coloring to add dots of color all over your pancake.

Next take a toothpick and drag it through the colors until you have made your fireworks to your liking!

When they were finished cooking, I gave the kids some colored sugars to add some razzle dazzle to their fireworks display. These were a huge hit! Fun to make and fun to eat!
Friday, July 8, 2011
Homemade Chicken Nuggets

To me, homemade chicken nuggets are SO much better than the processed ones! These were so delicious and easy and every one of my kids ate them!
Homemade Chicken Nuggets
Source: All Recipes.com
Ingredients:
3 skinless, boneless chicken breasts
1 cup Italian seasoned bread crumbs
1/2 cup grated Parmesan cheese
1 teaspoon salt
1 teaspoon dried thyme
1 tablespoon dried basil
1/2 cup butter, melted
Directions:
1. Preheat oven to 400 degrees.2. Cut chicken breasts into 1 1/2-inch sized pieces. In a medium bowl, mix together the bread crumbs, cheese, salt, thyme and basil. Mix well. Put melted butter in a bowl or dish for dipping.
3. Dip chicken pieces into the melted butter first, then coat with the breadcrumb mixture. Place the well-coated chicken pieces on a lightly greased cookie sheet in a single layer, and bake in the preheated oven for 20 minutes.
Wednesday, March 16, 2011
Cheesy Chicken Empanadas

These are a really fun finger food for kids. But tasty enough, that you will love them too!
I have tried lots of different fillings with these and for this recipe I have combined a concoction of my favorite fillings recipes, but be creative when you make your own and put in things that your family enjoys. I think it would also be fun to end the meal by making some dessert ones with apple pie filling!
Cheesy Chicken Empanadas
2 cups cooked shredded chicken
1 can (4 ounces) chopped green chilies
1 package (8 ounces) cream cheese, cubed
1/4 teaspoon ground cumin
1/4 teaspoon chili powder
1 pkg. refrigerated pie crust (or you can make your own)
If baking, you will also need:
1 egg
1 tbsp. water
opt. chili powder
1. Combine first five ingredients together in a large bowl. Preheat oven to temperature directions on pie crust package.
2. Roll out pie crust and cut as many 4 inch circles as you can get, combining pie crust scraps, re-rolling, and cutting more circles.
3. Place about 2 tbsp. of filling in the center of each circle.

4. Fold circles in half and seal edges with a fork. Carefully place on a baking sheet. Mix egg and water. Brush the tops of each empanada with the egg mixture. Sprinkle with extra chili powder. Bake according to pie crust directions.

5. You can also choose to fry these babies, which is also REALLY good. I have done both ways and they are equally great. Enjoy!
Tuesday, March 1, 2011
I Spy: A Mac and Cheese Adventure
I am so tickled with myself. This may be one of the cleverest things I have ever done with Mac and Cheese. So, Chew and Chew Dad has been out of town a lot these past couple of weeks with work. We seem to have this tradition that when Dad is gone, we have Mac and Cheese. Mac and Cheese is the all time favorite of the Chew and Chew kids, but I have questioned the nutritional value. So this time around I decided to sneak in some mixed veggies. I knew I would be met with anger, so I found a way to make it exciting and this is what I came up with...
I SPY: A MACARONI AND CHEESE ADVENTURE!
We love the "I Spy" books at our house, so I knew that this would especially appeal to my kids.

When the kids came to the dinner table (read counter), This is what was waiting for them. A bowl of mac 'n cheese with a game card and pencil per child.

Secretly, before I filled the bowls of mac 'n cheese, I taped a piece of gum to the bottom of each bowl. This is the "Bar of Silver" on the game card.

mmmm... just look at those gorgeous mixed vegetables. Our mac 'n cheese had carrots, peas, green beans, and corn.

I had looked up "treasures" on the Internet and copied pictures of jewels that closely matched their vegetable counterpart. When the kids found and ate the jewel/ vegetable, they could cross it off their list.

This is Sweetheart holding up a Peridot (aka. pea) that she found in her mac 'n cheese. Notice the big grin!

Okay, and the best part was, they could NOT figure out where the "Bar of Silver" was! I have never seen T-Man shovel mac 'n cheese into his mouth so fast. He was determined to be the first to find all of the items. It wasn't until he finished the whole bowl until he thought to look underneath. And when the other two found out there was gum, then everyone kicked it into hyper-eating drive to get to the gum. Gum is a hot commodity at our house! It gave me a big laugh. It was quite an adventure.
To make your own: I Spy: A Macaroni and Cheese Adventure:
Prepare your favorite brand of macaroni and cheese according to package directions.
Prepare a cup of mixed vegetables also according to package directions and mix together with the macaroni and cheese. To use my game card below, your mixed vegetables should include peas, green beans, corn, and carrots. I also used one stick of gum taped to the bottom of each bowl.
Click on my game card below to enlarge the image. Next, right click on the image and select "Copy", then open Microsoft Word, or another any program of your choice. Right-click on the blank document and select "Paste". This should give you a printable game card. You can also just right-click on my image and save it, then print it in whatever program works for you. You will need one game card per person.

Wednesday, February 23, 2011
Snowflake Quesadillas
One of my kids favorite things to do in Winter is make paper snowflakes. They make them by the hundreds and hang them everywhere. For lunch the other day we decided that we would try making our quesadillas into snowflakes and it worked!
I don't know why my computer, or maybe it's blogger, keeps flipping my images. I have tried everything. Does anybody know how to fix this?

Here's what we did. First clean a pair of kid friendly scissors (or kitchen shears if you have them) so that they are nice and sanitary. Give each child a FRESH tortilla. Stale ones will just break into pieces. Fold into half and then half again. Have the kids cut large shapes out of the sides, leaving some connecting pieces. (If you are not familiar with making paper snowflakes, you may want to practice with paper first.)
Butter another tortilla that hasn't been cut and place it butter side down on a heated skillet. Sprinkle with shredded cheese and top with the cut snowflake tortilla. Toast for a couple of minutes until the cheese is melty. You can then flip the quesadilla over and the cheese shouldn't fall out on the skillet if it melted enough, then toast for a couple of seconds until browned.
Serve with salsa and sour cream!
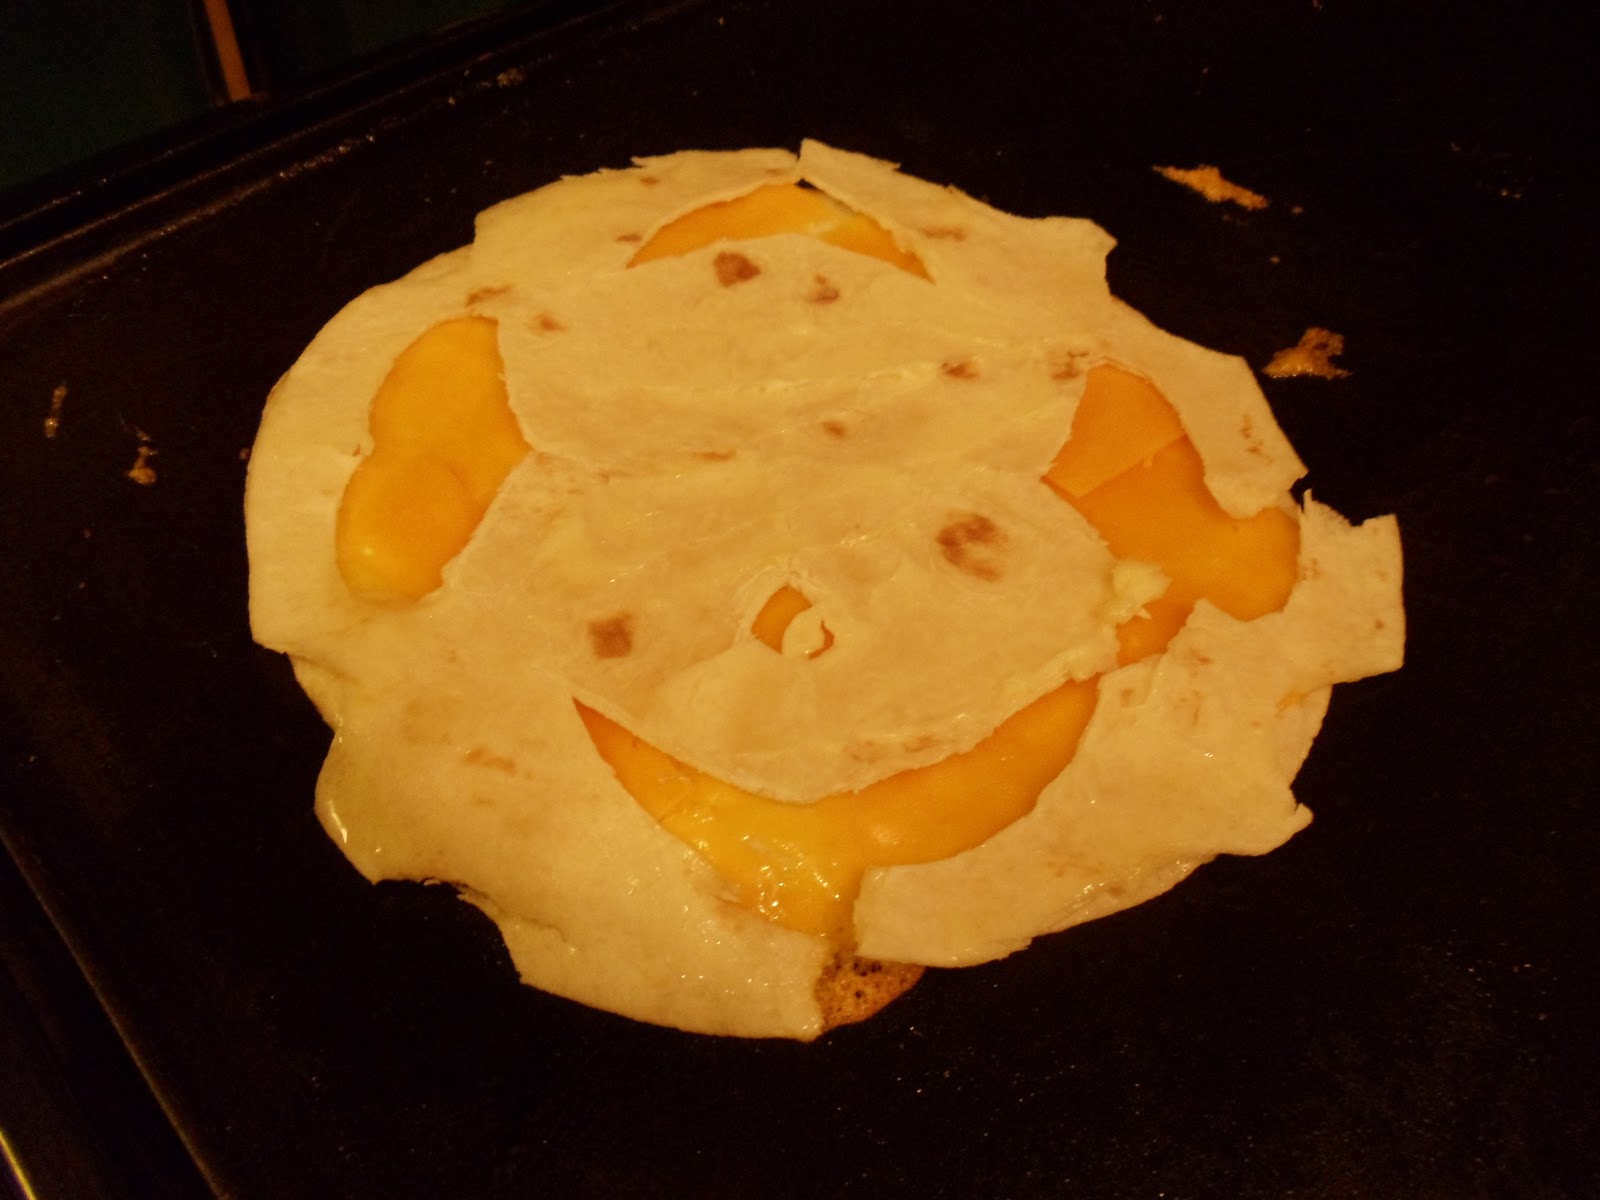
Ready to flip.
THEN, here is the best part. Take all of the cut out pieces and put them in a ziplock back and toss with melted butter, then lay them out on a cookie sheet. Sprinkle with cinnamon sugar and broil for a couple of minutes until browned. And now you have yourself a nice dessert!

Thursday, January 20, 2011
Omelets

For January, I tried to plan meals that were more on the low carb side of life to fulfill some New Year's resolutions for me and the hubby. I wasn't sure how the kids would take to omelets as they have never been big egg eaters. So to make the adventure more enjoyable, I used my mini-muffin pans and whipped up a batch of banana muffins to go with the meal. You can see that T-Man made his a banana muffin man.

To make meals more exciting at our house, I think it is always fun to have a lot of different choices for mix-ins. The kids feel some independence in making their own creations and are willing to try new things because they feel like they are inventing a recipe.

The omelets were a hit, even Buddy ate his all gone!
Directions:
I gave each child a mixing bowl, whisk, and two eggs. I let them each crack their own eggs (even Buddy who is 3). Letting them crack their own eggs makes the meal even that much better for them! Then I had them beat the eggs in their mixing bowls.
Next, the kids got to choose their own mix-ins from the following:
Peppers
Mushrooms
Onions
Cheese
Ham
Turkey
Bacon
This was our list of mix-ins, but there are so many more ingredients that you could use. Each took their desired amount of mix-ins and added them to their mixing bowls and then whisked them all together.
Finally, heat a frying pan to medium-high heat, melt some butter. Dump the whole content of the child's mixing bowl, fry for a few minutes until browned, then flip. Give it a few minutes more and TA-DA, individualized omelets. If you want to be fancy, you could sprinkle some parsley on top!
Thursday, January 6, 2011
Dinner Pinwheels
This is T-Man's favorite dinner of all times and a surefire hit with all of my kids. The thing that they love the most is that this meal always ends with cinammon rolls at the end!

I like to buy frozen dough because it is so fast and easy, however you can use your own roll dough recipe as well. I have a great roll dough recipe that I will share with you later.
First I buy Rhodes frozen bread loaves. They already come in three perfectly portioned lumps of dough. I place them in three well greased bowls first thing in the morning and by dinner time they have thawed and risen enough to use. Next, I roll each dough piece out into a large rectanglar section.

The next step is to spread with butter and then your choice of toppings. I forgot to take a picture, but that's okay because there are so many different topping choices. Some that we have tried are, dijon mustard, deli ham, and cheddar cheese. I have also done veggie cream cheese instead of butter, deli turkey, and swiss cheese. We have done a little pizza sauce (don't do too much or they don't work!), pepperoni, and cheese. And they have all been delicious.
After your toppings are added, roll it all up into a large snake. The same way you would do cinnamon rolls. And cut into 12 approx 1-1 1/2 inch pieces.

Place in a pan to rise. I would give them at least 30 minutes if not more. You will know they are ready when they are filling the pan.

And then bake those beauties at 350 degrees for about 20 minutes (check on them after about 15 minutes).
And voila a meal any kid will eat!
I usually use two of the bread loaf sections for dinner rolls and then the last section is saved for cinnamon rolls for dessert. Just roll the cinnamon rolls out the same with your favorite cinnamon roll filling and follow the same baking directions.
Best Ever Rolls
2 cups milk
1/2 cup shortening
1/2 cup sugar
1 cup luke warm water
2 tablespoons yeast
2 teaspoons sugar
2 1/2 teaspoons salt
3 beaten eggs
8-11 cups of flour
1. In a saucepan combine milk, shortening and 1/2 cup of sugar. Bring to a boil and then cool.
2. In a small bowl combine luke warm water, yeast, and 2 teaspoons of sugar. Set aside and let dissolve.
3. When the milk mixture cools, pour it into a mixing bowl. Add 1 cup of the flour and all of the yeast mixture, salt, and eggs. Beat until smooth, then add the rest of the flour.
4. Place the dough in a greased bowl and cover with plastic wrap. Let rise until double in size, then punch down, re-cover and let rise again.
5. When the dough has risen again, punch down and shape (here is where you would divide it into three sections and roll them out for pinwheels, BUT this recipe is also awesome for dinner rolls if you want to shape them accordingly.)
6. Place on a greased cookie sheet and let rise until almost touching (about 30 min.)
7. Bake at 375 degrees for 15-20 minutes.
My Favorite Cinnamon Roll Filling
4 Tbsp melted butter spread all over rolled out dough
In a Bowl, mix:
1/2 cup sugar, 2 tsp cinnamon, and 1/4 cup brown sugar. Sprinkle over melted butter all the way to the edges. Add raisins if desired.
Awesome Cinnamon Roll Glaze
1 1/2 cups powdered sugar
2 1/2 tbsp milk
2 tbsp butter
a couple of drops of vanilla.
Mix until smooth and flowing, but not overly runny. Add a little extra milk if needed.
Turkey Feather Twists
How lame am I to finally get around to posting my Thanksgiving treat in January. I was going to save it until next November, but then I got worried that I would forget or lose the pictures. So next Thanksgiving, if you need something creative and fun, search my Thanksgiving treats!
TURKEY FEATHER TWISTS

Aren't they cute, there are so many different ways to present them.


Ingredients:
Refrigerated or frozen breadstick dough (or your favorite breadstick recipe), enough for 12 breadsticks
2 Tbsp butter, melted
1/4 cup sugar
1 tsp cinnamon
Glaze:
1 1/2 cups powdered sugar
2 Tbsp butter, softened
2 ½ Tbsp milk
¼ tsp vanilla
Food coloring
Colored sprinkles (optional)
Directions:
1. Preheat oven to 350 degrees.
2. Prepare breadsticks according to package directions, or if using your own recipe make breadstick dough and shape into 12 long bread sticks, but don’t bake yet.
NOTE: I used 12 portions of frozen roll dough. I let the portions thaw for 2-3 hours and then rolled into uniform size breadsticks.
3. Pour melted butter into a pie tin or a shallow baking dish. Mix sugar and cinnamon in a separate pie tin or baking dish. Dip each breadstick first into the butter, making sure to coat evenly, and then into the cinnamon sugar mixture.
4. Twist each breadstick from both ends, until you have twisted them to your satisfaction. Lay breadsticks on a greased cookie sheet.
5. Bake for 15 minutes.
6. When the breadsticks have cooled prepare glaze mixture. Pour powdered sugar, butter, milk, and vanilla into a mixing bowl and mix until well blended.
7. Pour glaze into small bowls, one for each color of feather desired. Add drops of food coloring to tint glaze and stir until well blended. Evenly coat each Feather Twist with tinted glaze and add colored sprinkles if desired.
Monday, November 22, 2010
Turkey Kisses
This was my last week of Thanksgiving-themed preschool lessons, so of course we had to have a Thanksgiving feast! Each preschooler brought a food to share. We had olives, popcorn, cheese cubes, banana muffins, and cookies.
To celebrate the letter of the day, "K" I came up with these little gems,
"Turkey Kisses"

I bought some creme filled vanilla cookies, Hershey's kisses, and candy corns. Then using all the left over frosting that I had from my Halloween bake-off, I attached them thusly.
When I made them again later, I gave them a little red waddle with the frosting to hang off of their kiss face and it looked even cuter.

Pilgrim boys enjoying the feast

And my two pilgrim girls
Friday, November 12, 2010
Preschool, Thanksgiving, and The Letter "J"
This was week 2 of being in charge of Buddy's preschool and this week we were in charge of letter J. What on earth can tie Thanksgiving in with the letter J? Go ahead think of a word, I dare you, and no, "jam" doesn't count!
There isn't one, so we had to make our own tie in with Gratitude "Jars" filled with "jellybeans"!
Each preschooler glued the felt pieces together to make their turkeys.
This is what they looked like...

The poem attached says, "Here's my jar of gratitude, And with each jellybean I'll say, Something that I'm thankful for, As I countdown to Thanksgiving Day!"
I wrote it myself, did you know I was such an amazing poet?

The pieces are attached to a baby food jar filled with jellybeans. The kids are supposed to say something that they are thankful for each time they eat a jellybean.

It was amazing hearing my own kids count their blessings all week as they munched on jellybeans.

And when we were done with the craft, we played some "Thankful Bingo". I printed off bingo cards that I made using a 3x3 table and put pictures of items that 3 year olds would be thankful for. Each card was different and the first child to fill up their card won a prize. I don't think that any of these 3-year olds had played bingo before, and now that we're all so good at it, I will be taking them all to play Bingo at Fort Hall Casino next week, where we will also continue our study of Indians!
I got the idea for the turkey jar and the pattern for the pieces here.
Thursday, November 4, 2010
Corn A'Plenty
It is my turn to teach Buddy's preschool class this month and today we were in charge of the letter "I". Hmmm... what on earth could we possibly make or do that ties "I" in with Thanksgiving?
INDIAN CORN!


Glue on some leftover cornstock around the stem and hang your beautiful decoration!
And now, the recipe for the Indian corn on the cobbers.
INDIAN CORN SNACKS
4 tablespoons of butter
4 cups of mini marshmallows
5 cups of colored ball shaped cereal (I used a generic trix and sorted out the yellow, red, and orange)
Fruit Leather (we so happened to find green fruit roll-ups, thank you Shrek!)
Popsicle sticks
In a large pot, melt butter and mini marshmallows over low heat (about 5 minutes).
Remove the mixture from the stove and use a wooden spoon to stir in cereal. Allow the mixture to cool for about 10 minutes.
Using buttered hands, shape each treat by pressing 1/3 cup of the mixture around a Popsicle stick. Add fruit leather husks to the bottom of the ear, slightly moistening them to help them stick if needed. Makes 15 treats.
*This recipe was inspired by this post on Disney's Family Fun website, however they made theirs with puffed corn cereal (Kix or Corn Pops) and mixed the cereal with diced dried fruit. I didn't think my kids would eat the dried fruits that they used, so I made mine this way. But theirs look totally cute also. They also had a really cool indian corn cookie that I just noticed today. You can check it out here!
Wednesday, November 3, 2010
Gnocchi, It's not Just the Cat on Curious George!
Ever since my kids started watching Curious George on PBS several years ago, I was curious about where the name of the cat, "Gnocchi" came from. (Ha! Curious George made me curious!)
After some research online, I found out that gnocchi are small dumplings that can be made from potatoes, pumpkin, ricotta cheese, or various other mediums.
We found a basic potato gnocchi recipe and tried it out. It is now one of my favorite Fall comfort foods and a very fun recipe to bake together with the kids! Best of all you can use your leftover mashed potatoes from Thanksgiving dinner and give them a makeover into something delicious and inexpensive.


2 beaten egg yolks ($1.84 per 18 = about $0.10 per egg) $0.20
1 1/2 cups flour ($1.54 per 5lbs or 19 cups = about $0.08 per cup) $0.20
1/4 cup Parmesan Cheese ($4.29 per 8 oz. = about $0.10 per TBSP) $0.40
1 tsp. thyme ($4.29 per 0.37 oz or about 10 tsp= about $0.43 per tsp) $0.43
Pinch of salt (under $0.01) $0.01
After some research online, I found out that gnocchi are small dumplings that can be made from potatoes, pumpkin, ricotta cheese, or various other mediums.
We found a basic potato gnocchi recipe and tried it out. It is now one of my favorite Fall comfort foods and a very fun recipe to bake together with the kids! Best of all you can use your leftover mashed potatoes from Thanksgiving dinner and give them a makeover into something delicious and inexpensive.

Seriously, doesn't this look SO good?
Start by making your dough. The dough is about 2 cups mashed potatoes. (If you don't know how to make mashed potatoes.... really you don't?...Well, then peel about 4-5 medium or 2-3 large potatoes, cut into small pieces and boil for 15-20 minutes. Mash with a masher or in a food processor. I, personally, dump the boiled potatoes into my Kitchen Aid mixer, whip them on high, and Voila! mashed potatoes.) When the mashed potatoes have cooled, so that you don't cook the eggs, add 2 beaten egg yolks, 1 1/2 cups flour, and a pinch of salt. I also like to add a tsp of thyme and 1/4 cup of Parmesan cheese for flavor. The dough needs to be stiff enough that you can roll it into a long snake. If it isn't the right consistency, keep adding flour until it is right.

Next, I let the kids roll the dough into long snakes.

Then cut into 1/2"-1" pieces.

Press each piece in the center with a fork.

Gather gnocchi together until it is ready to boil.

Boil for about 5-10 minutes in a large pot of salted water until all gnocchi are floating at the top. Drain then toss with your favorite pasta sauce. Ours is Ragu. And if you want to be really fancy, sprinkle with cheese and a little bit of parsley flakes. Parsley always makes our dinners extra fancy!
Gnocchi
Ingredients
2 lbs whole baking potatoes (10lb. bag for $1.99 = about $0.07 per potato) $0.352 beaten egg yolks ($1.84 per 18 = about $0.10 per egg) $0.20
1 1/2 cups flour ($1.54 per 5lbs or 19 cups = about $0.08 per cup) $0.20
1/4 cup Parmesan Cheese ($4.29 per 8 oz. = about $0.10 per TBSP) $0.40
1 tsp. thyme ($4.29 per 0.37 oz or about 10 tsp= about $0.43 per tsp) $0.43
Pinch of salt (under $0.01) $0.01
Shredded Cheese ($2.99 per 8 oz or about 0.37 an ounce) $0.74
Your favorite pasta sauce $1.29 per jar = $1.29
Serves 5
Total Cost for Meal: approx. $3.62!!! or $0.73 per serving and those aren't even sales prices!
Your favorite pasta sauce $1.29 per jar = $1.29
Serves 5
Total Cost for Meal: approx. $3.62!!! or $0.73 per serving and those aren't even sales prices!
Subscribe to:
Posts (Atom)